How to Install a Wall Mount for TV
Mounting your TV on the wall can transform your living space, save valuable floor space, and enhance your viewing experience with better angles. While the process might seem intimidating at first, it’s entirely manageable with the right tools and a clear plan. This comprehensive guide will walk you through every step of installing a wall mount for your TV, ensuring a secure and professional-looking setup. Whether you’re a DIY beginner or a seasoned home improver, you’ll find everything you need to know right here.
Tools and Materials Needed
Before you begin the TV wall mount installation, gather the following tools and materials. Having everything on hand will make the process smoother and more efficient:

-
Wall mount kit: Ensure it’s compatible with your TV’s size (e.g., 32–65 inches) and weight capacity (check your TV’s manual).
-
Stud finder: Essential for locating wooden studs behind drywall to provide sturdy support.
-
Level: Keeps the mount straight for a polished look.
-
Drill and drill bits: For creating pilot holes in the wall.
-
Screwdriver: To secure screws into the wall and TV brackets.
-
Measuring tape: For precise measurements of height and spacing.
-
Pencil: To mark drilling spots on the wall.
-
Wall anchors: Necessary if you’re mounting on drywall without studs (though studs are preferred for safety).
Always read the instructions included with your wall mount kit, as some models may require additional tools or specific hardware.
Step-by-Step Installation Guide
Follow these detailed steps to install your wall mount and hang your TV securely. Take your time with each part to avoid mistakes.
Step 1: Choose the Location
Selecting the right spot is crucial for both aesthetics and functionality. The center of the TV screen should ideally be at eye level when seated, typically 40–60 inches from the floor. Measure the distance from your seating area—about 1.5 to 2.5 times the diagonal size of your TV is a good rule of thumb (e.g., 6–10 feet for a 50-inch TV). Avoid placing the TV where sunlight from windows causes glare, and ensure there’s access to power outlets and cable connections. Check for proper ventilation space around the TV as well.
Step 2: Find the Studs
TVs are heavy, so mounting into wooden studs is the safest option. Use a stud finder to locate the studs behind your drywall. Slide the device across the wall until it beeps or lights up, indicating a stud. Mark the edges of each stud with a pencil. Most studs are spaced 16 or 24 inches apart. If your desired location doesn’t align with studs, you’ll need heavy-duty drywall anchors, but this is less secure and not recommended for larger TVs.
Step 3: Mark the Mounting Holes
Position the wall mount against the wall at your chosen height, aligning it with the stud marks. Use a level to ensure it’s perfectly horizontal—crooked mounts look unprofessional and can strain the TV. Once level, mark the mounting holes on the wall with a pencil through the mount’s screw slots. Double-check your marks to confirm they align with the studs and the mount is still level.
Step 4: Drill Pilot Holes
Using a drill bit slightly smaller than the screws provided in your kit, drill pilot holes where you marked. If you’re drilling into studs, go about 2 inches deep to ensure a strong hold. For drywall with anchors, follow the anchor manufacturer’s instructions for depth. Keep the drill steady to avoid enlarging the holes unnecessarily, and clear away any dust after drilling.
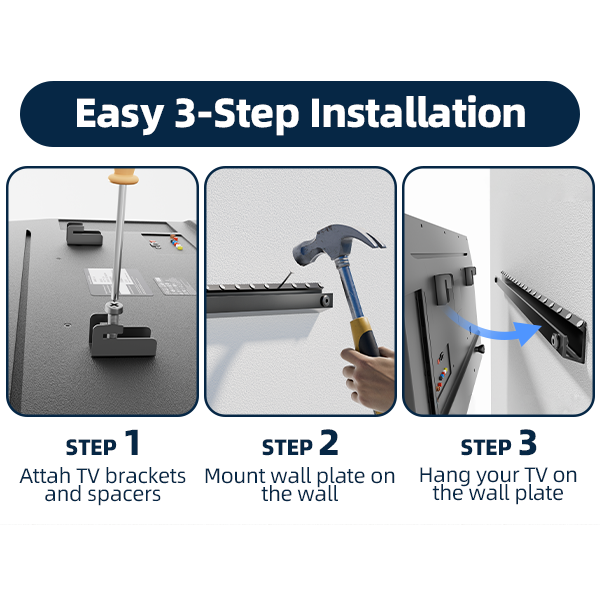
Step 5: Attach the Wall Mount
Line up the wall mount with the pilot holes and secure it using the screws from the kit. Use a screwdriver or drill with a screwdriver bit to tighten them firmly, but don’t overtighten, as this could strip the wood or damage the mount. After attaching, gently tug on the mount to confirm it’s secure and use the level again to verify it’s still straight.
Step 6: Attach the Mounting Brackets to the TV
Lay your TV face-down on a soft surface, like a blanket, to avoid scratching the screen. Locate the mounting points on the back—usually four threaded holes in a square or rectangular pattern. Attach the brackets from your kit to these points using the provided screws. Tighten them securely, but be cautious not to overtighten, as this could damage the TV’s casing. Check your TV manual if you’re unsure about screw size or placement.
Step 7: Hang the TV
This step often requires two people, especially for larger TVs. Lift the TV by its edges (not the screen) and align the brackets with the wall mount. Hook or slide the TV onto the mount as per the kit’s design—some lock into place, while others require additional screws. Once hung, gently pull on the TV to ensure it’s locked in securely. If it’s a tilting or full-motion mount, adjust the angle as needed.
Step 8: Connect Cables
Plug in the power cord, HDMI cables, or any other connections. To keep things tidy, use cable clips or ties to secure them along the wall or behind the TV. If you’re hiding cables in the wall, ensure compliance with local electrical codes and consider professional help for a clean finish.
Step 9: Test the Setup
Turn on the TV to confirm it works and the picture is clear. Check the mount’s stability by lightly pressing on the TV—it shouldn’t wobble or feel loose. If it’s a tilting mount, test the range of motion. Sit back and enjoy your newly mounted TV, making any final adjustments to the angle or position.
Tips and Tricks
Here are some extra pointers to ensure a smooth TV wall mount installation:
-
Verify compatibility: Before starting, confirm the wall mount supports your TV’s size and weight to avoid safety issues.
-
Use a level obsessively: A crooked TV is noticeable and annoying—check alignment at every step.
-
Avoid solo lifting: For TVs over 40 inches, get help to lift and hang it safely.
-
Hide the mess: Invest in cable management solutions for a sleek, professional look.
-
Troubleshooting: If the mount isn’t level after drilling, use washers to adjust, or re-drill if necessary.
If you’re unsure about any part of the process, don’t hesitate to consult a professional—better safe than sorry with expensive electronics.
Conclusion
Installing a wall mount for your TV is a rewarding project that elevates your home entertainment setup. By carefully choosing your location, securing the mount to studs, and following each step precisely, you’ll achieve a sturdy and stylish result. Take your time, double-check your work, and soon you’ll be enjoying a clutter-free space with perfect viewing angles. Ready to get started? Grab your tools and transform your room today!